Need to Brush up on your Sashimi Knife or Sushi Knife Knowledge?
~~~
(If you do, then hang around to find out things like...)
What are the different Types of Knives?
~ or ~
What is the Best Knife to get?
~ and ~
How do you care for, use and sharpen it?
(along with lots of other fun stuff!)
A good sushi knife or sashimi knife is a very nice utensil to have when you are making sushi or sashimi at home. If you are a sushi chef, then it is an essential piece of equipment to do your job well.
(wanna write a review about YOUR sushi knife? tell us about it here)
One thing that makes traditional Japanese knives different from western knives is the fact that many types are honed only on one side; the right side. For a left handed person, they would have to special order the knife honed on the left side.
This single sided honing allows one to create the sharpest edge possible on a sushi knife. Much sharper than can be accomplished with a traditional western style knife which is honed equally on both sides and are known as double-edged knives.
If you are just starting out, whether at home or at work, knowing which sushi knife you will need or what each is used for can be confusing.
Let's try to clear things up a bit for ya.
The Two Main Types of Japanese Sushi Knives
Too make this discussion complete, we should probably cover these knives with a broad stroke and then drill down.
There are 2 main groups of Japanese knives and they are divided based on how they are honed.
A traditional sushi knife is honed on one side and a Japanese western-style sushi knife is honed on both sides (double-edged) and is based on western knife design but with a Japanese influence.
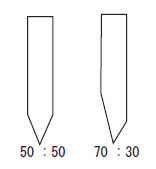
The main Japanese influence is that instead of being ground 50:50 (or like a "V") typical of standard western knives, they are ground to a thinner asymmetrical edge with ratio's like 70:30, 60:40 and 90:10.
See image 70:30 below for an example of the Japanese version of the western blade edge compared to a standard 50:50 edge. 70:30 seems to be the most common.
Common 50:50 Blade edge vs Japanese Western-style 70:30 blade edge
By creating a steeper angle on the front face blade edge than on the back side, a thinner cutting edge is created which gets closer to the sharpness of the traditional single-edge sushi knife design.
So now that you know the main difference between the two let's look at the most common styles in each group.
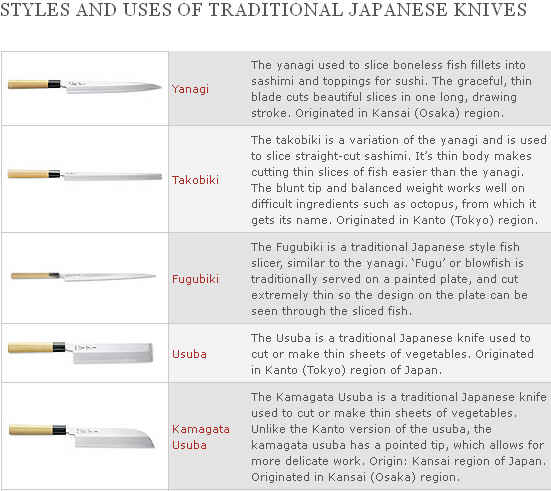
Different Traditional Style Japanese Knives
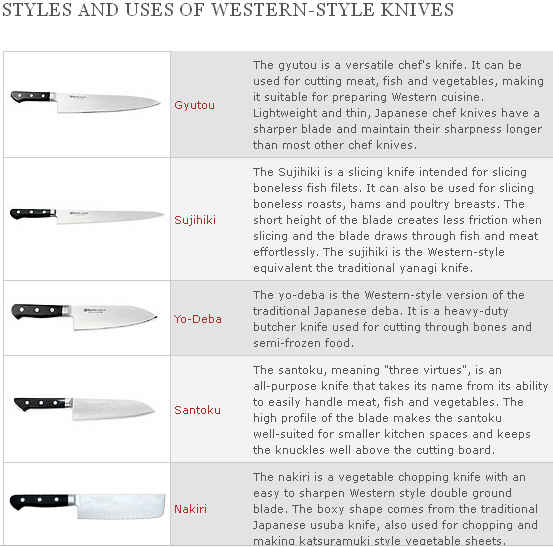
Different Western-Style Japanese Knives
Don't let the previous list of traditional and western knives confuse you. I'm just trying to be clear and complete so that you can reference the information later if you need it.
The focus moving on from here will mainly be in reference to the traditional single edged sushi and sashimi knives.
Traditional Knives typically used in making Sushi
Sushi Chefs generally use 3 different kinds of knives when making sushi. Click the link(s) below if you want to see a good variety of each type of knife on Amazon.
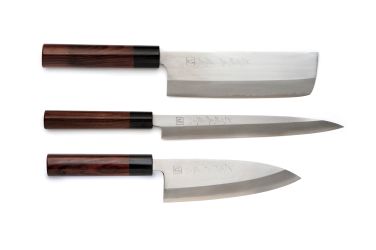
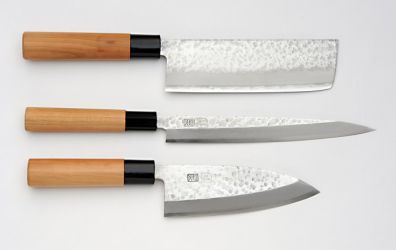
1. Deba-bocho. A heavy duty cleaver used for tough jobs like cutting through the bones and cartilage of fish. In the pictures above, the deba is the one on the bottom.
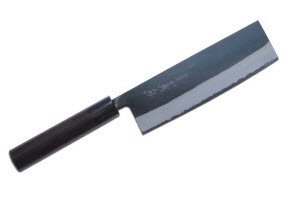
2. Usuba-bocho/Kamagata Usuba-Bocho and Nakiri-Bocho (Western style). A vegetable knife used for peeling, slicing and chopping. The Usuba-bocho is the one on top in the pictures above.
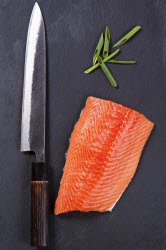
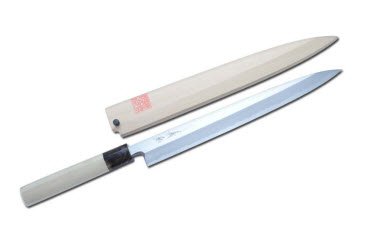
3. Yanagiba or Sashimi-bocho. A sashimi knife used to slice up raw block of fish and fish fillets. The Yanagiba is the long slender one in the middle.
Let's go over each one individually.
Deba-Bocho
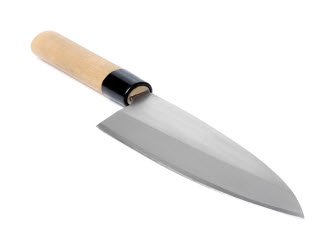
The Deba is a small, curved Japanese carving knife that is designed to remove the heads from and then fillet the fish. It could almost be best described as a cross between a meat cleaver and a chef's knife.
They come in varying sizes starting from 4 inches all the way up to 12 inches long. The blades on these knives are normally thick, strong and beveled on one side and is designed with a more obtuse angle on the back of the heel making it ideal for the hard work of removing the heads off of fish. The remainder of the blade is then used to lay against the bones of the fish to remove the fillet.
This sushi knife is not really a required item for a home sushi chef. It is mainly used by professional sushi chefs who spend a part of their long day preparing whole fish for sushi.
In most cases at home you will probably obtain your fish in blocks and most likely frozen, so the need to remove the head and fillet a fish is unlikely. On occasion when the need does come up, the standard chef's knife that you probably already have at home should work just fine as long as it is sharp.
You can take a look at some Deba knives here...
Usuba-Bocho/Kamagata Usuba-Bocho and Nikiri-Bocho
The Ususba knife is a Japanese-style vegetable knife with a thin, straight blade edge that is sharpened on the right side. This sharpening on one side is known as Kataba.
Better quality Usuba knives have a slight depression on the flat side of the blade. This Usuba Kataba style sushi knife (flat, thin, blade sharpened on one side with depression on the flat side) makes it possible to cut thinner slices than is possible with a double edged blade (also called ryoba) although the ryoba style makes it easier to make straight cuts. It also takes more skill to properly use a Kataba style Usuba sushi knife.
There are many terms used to describe these usuba knives so let's try to take is slow and hopefully make understanding the differences clearer.
Usuba Knives
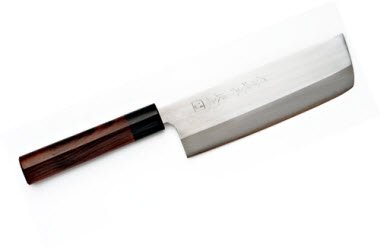
All of these knives are Usuba knives and actually usuba means "thin blade". They are normally used by professional Japanese chefs. The picture on the right above is what you could call a standard usuba knife. It has a square blunt edge on the front that is most popular in the Kanto region of Japan or more easily recognized as the area around Tokyo.
Kamagata Usuba Knives
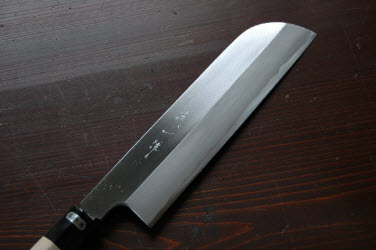
The Kamagata usuba variation is more popular in the Osaka region and features a spine that slowly drops down to the edge of the tip. The picture above on the left is an example of this style. This tip is used to make intricate cuts and designs in vegetables.
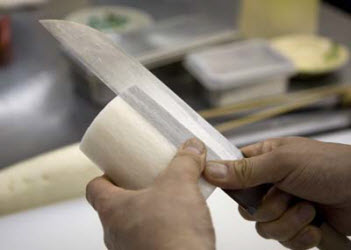
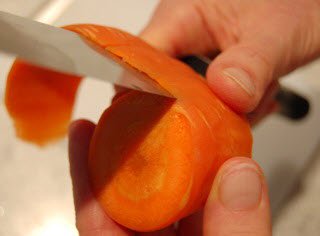
The Usuba sushi knife in general is most popularly used for chopping and slicing razor thin sheets off of vegetables for Katsuomuki. See examples of this in the pictures below.
Nakiri Bocho (Japanese Western-style knife)
Now, the Nakiri sushi knife is also available in the same "styles" (blunt front end and curving front end) as mentioned above, but the difference is that it is designed more for home use because of its double-edged blade (called Ryoba).
The ryoba style is easier to master and is easier to make straight cuts with making it more appropriate for home use. It also usually has a black blade.
If you must have one of these Usuba knives to slice and chop your vegetables, just know the differences explained above and you'll be able to pick out just what you want.
For all intent and purposes however, you could get by with a good, sharp standard chef's knife but to really enjoy the entire sushi making experience at home it is nice to have these authentic sushi chef knives available.
Here's a few Usuba knives to look at.
Yanagiba
In Japan, preparing sushi and sashimi is very serious business. One of the most important requirements is that sliced meat be smooth, shiny and sharp when viewed through a microscope. This kind of precision can only be accomplished with a special knife like a Yanagiba.
The Yanagiba is a long, very thin, single beveled (usually on the right side) sushi knife used in preparing sashimi and sushi. Left hand versions can be obtained that are beveled on the left side, but they are very expensive.
This kind of knife is specially designed to be pulled in one direction, the goal of which is to sever the cut in one swift motion beginning at the heel of the knife and ending at the tip. No pushing action is recommended as this would ruin the smoothly cut surface of the meat and probably tear it.
The thinness of the blade allows the knife to be pulled with very little force which aids in the cutting action. Higher quality knives have a slight depression on the back (or flat) side to keep the piece from sticking, allowing it to be removed easily.
The length of these knives varies from 8 to 12 inches and there is no "best" size. Mostly its a matter of personal preference. Just know that the longer the knife is, the harder it is to use for most people.
What Type of Steel is best?
The best type of steel seems to be a matter of debate for most people who know anything about these knives. There are basically 3 different types of steel used to make a Yanagiba, but they actually apply to the Deba and Usuba also.
Carbon Steel
The first is carbon steel. This type of steel gives the sharpest edge possible but requires the most maintenance and can rust. So if you buy a sushi knife made of carbon steel, you will be sharpening it more often than other types of steel and you'll also have to be very diligent in keeping the blade washed and completely dried.
Stainless Steel
The second choice is stainless steel. Stainless steel does not rust but it also does not hold as sharp an edge as carbon steel or composite steel.
Composite Steel
And last but not least are the composite steel knives that hold a sharper edge than stainless steel and are less susceptible to rust but can be quite costly.
So which do you Choose?
Which one you choose will come down to personal preference.
If you have to have the sharpest possible sushi knife available, then choose carbon steel. Just be ready to keep it sharpened and well cleaned and dried after each use. If stored for an extended period of time, you should put vegetable oil on the blade and wrap it in a newspaper.
If you want a low maintenance sushi knife that is not going to rust and you don't care if yours is not the sharpest sushi knife in town, then stainless steel may be the best option for you.
And if money is not an object, and you want some of the benefits of stainless steel but the ability to sharpen the blade to a higher degree then one of the composite steel knives may be worth looking into.
Either way it comes down to what you want, need and can afford. Take a look at some Yanagiba's here...
If you can only get one...
Which is the Best Sushi Knife to get?
A good quality sushi knife can cost quite a bit of money. And picking out the best sushi knife for your uses can be a little daunting to say the least. Expect to pay at least a hundred dollars at the lower end of the scale for a quality knife.
Because of the cost, it is understandable if you can only buy one of these at a time.
What is the Best type of Sushi Knife to get first?
Deba, Usuba or Yanagiba?
If I had to pick just one, the first one I would get is a high quality Yanagiba.
You will be able to make delicate sashimi cuts with it and will also be able to slice swiftly and cleanly through your Maki rolls with it to. It is the knife whose functionality your current chef's knife will have the most trouble duplicating out of all 3 of the knives.
The functions of the Deba and the Usuba can be done with a standard, sharp, good quality chef's knife until you can afford or decide to invest in either or both of those later.
When you do decide to get one of these as your second knife, I would get a Usuba. You will be able to more easily slice razor thin vegetable slices for Katsuomuki with this knife and make all of your other chopping and slicing responsibilities a tad bit more of a pleasure.
What is the Best Sushi Knife Brand to buy starting out?
You know this is a highly debatable subject and I hesitate to even make a suggestion. Because no answer is really the right answer. But I will make one based mainly on the probability that most people who are reading this are more than likely starting out and are looking to step into this world of sushi, sashimi and high quality sushi and sashimi knives for the first time and as such, don't want to spend and probably should not spend more than a couple hundred dollars on their first knife.
So. With that, out of all the affordable brands of these knives that I have found and used, Yoshihiro
is my favorite. All of their knives are affordable and high quality.
Most are all between $100 and $200 dollars on Amazon, and are a great
starter knife for at home use for the beginner.
Now, I know that there are many, many others out there that you probably can highly recommend and I'm sure they are fine knives also. But, hey...you know it's kinda like whether you like Ford or Chevy better...or Nissan versus Toyota...Everybody has a personal preference.
That was just mine.
(would you like to write a review about YOUR sushi knife? tell us about it here)
Anyway, when a professional grade chef's sushi knife or sashimi knife can run into thousands of dollars, this is a low price to pay for a chance to experience the quality and difference in performance that these knives have to offer.
Now assuming that you decided to invest in one of these fine pieces of cutlery, let's tackle how to hold and use your new Sashimi knife.
How to hold and slice with your Yanagiba (Sashimi) Knife
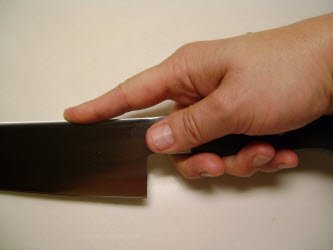
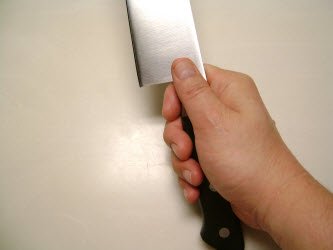
- Grasp the handle comfortably with your right hand and extend your index finger out along the blade. This will give you better control.
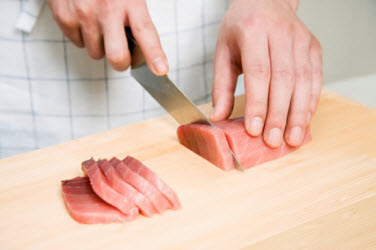
- When making a cut, start at the base of the knife (nearest your body) and draw the knife toward you completing the cut at the tip. The goal is to make the entire cut in one motion.
Common Sashimi Knife Cuts
Straight Cut ("Hira Giri")
This is the easiest cut to make and is commonly used for sashimi, nigiri sushi, scattered sushi (chirashi sushi), pressed sushi and used for making "sticks" that go in Maki sushi.
To make this cut:
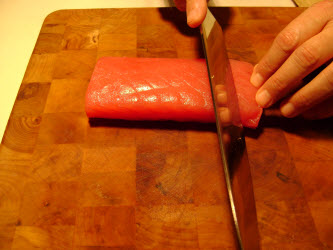
- Place a block of fish horizontally in front of you roughly the size of your hand (approximately 2 1/2 to 3 inches wide and 1 to 1 1/2 inches thick).
- Wipe the knife with a damp towel before each slice to keep the fish from sticking to the knife.
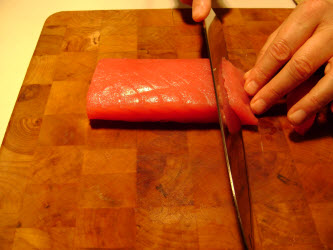
- Place the knife's blade, towards the base, on the right hand end of the fish at the desired thickness.
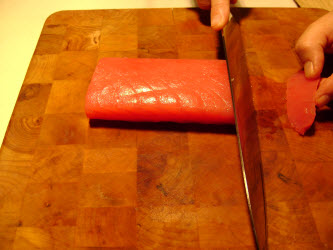
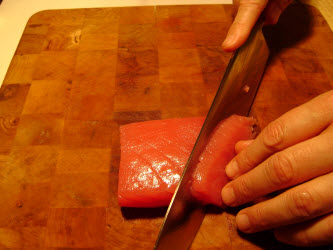
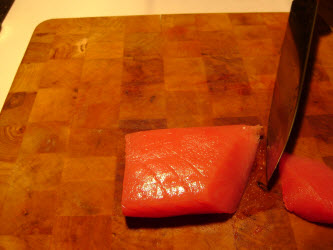
- Smoothly pull the knife toward you through the fish in one stroke ending at the tip of the blade completing the cut.
- Move the piece to the right a few inches with your knife and tip it over.
- Repeat until you have the number of pieces desired.
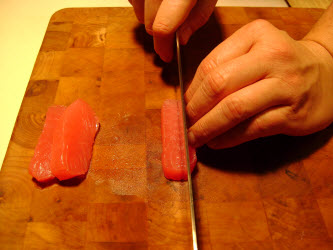
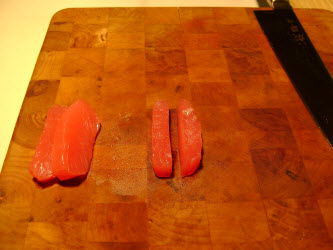
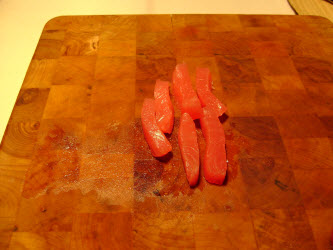
- You can slice these pieces in half like in the pictures below to make matchsticks maki rolls.
Straight across Angled Cut ("Sogi Giri")
This first variation of the angled cut is the easiest one to make and is similar to the straight cut done above in that your knife cuts are straight across the fish.
It is used Nigiri sushi, sushi rice balls, pressed sushi, and inside-out rolls.
- Place a block of fish horizontally in front of you roughly the size of your hand (approximately 2 1/2 to 3 inches wide and 1 to 1 1/2 inches thick).
- Wipe the knife with a damp towel before each slice to keep the fish from sticking to the knife.
- Place the knife's blade, towards the base, on the left hand end, straight across the the fish and at the desired thickness.
- Now tilt the knife slightly to the right and smoothly pull the knife toward you through the fish in one stroke ending at the tip of the blade completing the cut.
- Move the piece to the left a few inches with your knife and tip it over.
- Repeat until you have the number of pieces desired.
Diagonal Angled Cut ("Sogi Giri")
This is the second variation of the angled cut. Instead of being a straight cut across the fish, it is at about a 45 degree angle diagonal to the fish.
This creates a more graceful looking, slightly longer and wider piece of fish that looks very impressive draped over the hand-formed piece of rice as in Nigiri sushi.
For this cut:
- Place a block of fish horizontally in front of you roughly the size of your hand (approximately 2 1/2 to 3 inches wide and 1 to 1 1/2 inches thick).
- Wipe the knife with a damp towel before each slice to keep the fish from sticking to the knife.
- Place the knife's blade, towards the base, on the diagonal on the left hand end of the fish.
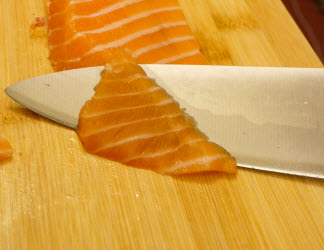
- Now tilt the knife slightly to the right and smoothly pull the knife toward you through the fish in one stroke ending at the tip of the blade completing the cut. (The first cut will create a triangular piece that you can butterfly and open up to create a flat piece.)
- Make your second piece by following the diagonal and angle established in your first cut, slicing whatever thickness you need.
- Move the piece to the left a few inches with your knife and tip it over.
- Repeat until you have the number of pieces desired.
Well, what do you think? If you just used a Yanagiba for the first time following the directions above what was your first impression?
If you got a good quality one, I bet a smile came across your face the first time you sliced a piece of meat with it and then you probably thought...WOW! Why didn't I get one of these before?
Most people never know how impressive these knives are. Totally worth the price, No?
Moving on, let's try our hand at holding and using your Usuba Knife.
How to hold and slice with your Deba (Fish) or Usuba (Vegetable) Knife
- Grasp the handle comfortably with your right hand close to the blade end. The knuckle of your index finger should be almost on top of the handle, toward the blade end.
- Use your thumb to press into the side of the handle with your other fingers curling and wrapped around the handle.
- These knives are so sharp that cutting in one gentle motion, backed by the weight of the blade should be all you need to complete cuts.
Common Usuba (vegetable) Sushi Knife Cuts
Ribbon Cut
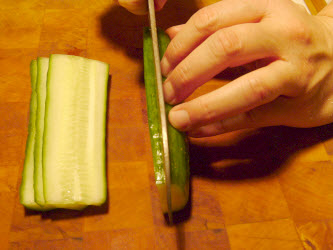
Ribbons are long wide strips of vegetables used commonly in Nigiri Sushi and Pressed Sushi. They will look somewhat like wood boards when they are sliced to give you an idea of what you're shooting for.
Thin ribbon cuts are the first cuts made for making "slivers" and minced vegetables. Thick ribbon cuts are the first cuts made for making "matchsticks" and cubes.
It's basically a building block cut.
Here's how you do it:
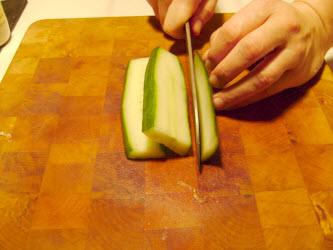
- Start with a 3 or 4 inch long unpeeled cucumber (you can substitute whatever appropriate vegetable you want here).
- Lay the cucumber in front of and pointing away from you.
- Decide the desired thickness that you need (1/8 inch or less for thin ribbons (picture above on the left) and 1/4 to 1/3 inch for thick ribbons (picture above on the right) and using the front edge of the blade, push the knife away from you through the cucumber. (did you notice that the technique with the Usuba is to use the front end of the blade first and push instead of using the back end of the blade and pulling as done with the Yanagiba?)
- Repeat steps 1, 2, and 3 until you have all the slices you need.
Cutting Slivers and Mincing from "Thin" Ribbons
Vegetable slivers are used in all kinds of sushi including scattered sushi, hand rolls (temaki sushi), maki rolls, and inside-out rolls.
They are used when you want a finer, more delicate vegetable texture in your sushi.
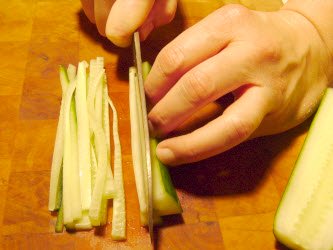
- Start off by making thin ribbons (less than 1/8 inch) as explained in the ribbon cut section above.
- Now, stack the ribbons on top of each other like boards.
- Stair step the stack (kind of like pushing a deck of cards).
- Using the front edge of the blade, push the knife away from you slicing the ribbons lenghwise into the thinnest slivers possible until the entire stack is sliced.
- If you are wanting to mince this, then turn the whole "pile" of slivers you just made horizontally in front of you and cut as little off of the slivers as possible and continue till the whole pile is done.
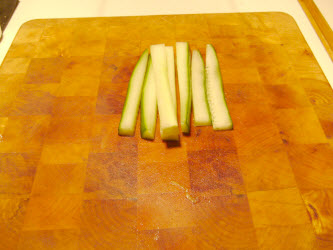
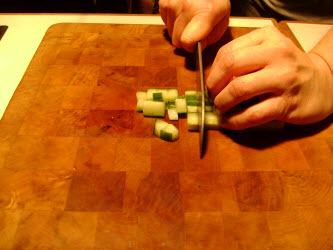
Cutting Matchsticks and Dicing from "Thick" Ribbons
Matchsticks kinda look like the skinny french fries you can get at McDonalds.
They are most often used in Maki rolls and Temaki Rolls (hand rolls) and are preferred when you want a less delicate and more predominant crunchy texture to the vegetables in your sushi.
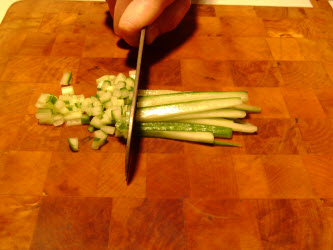
- Start off by making thick ribbons (1/4 to 1/3 inch thick) as in the ribbon cut section above.
- Now, stack the ribbons on top of each other like boards.
- Using the front edge of the blade, push the knife away from you slicing the ribbons lenghwise into 1/4 to 1/3 inch matchstick pieces until the entire stack is sliced.
- If you are wanting to dice this, then turn the whole "pile" of matchsticks that you just made horizontally in front of you and cut across them making 1/4 to 1/3 inch pieces. Continue until the whole pile is done.
After you get done slicing and chopping and mincing with your sushi knife, you need to clean and store it properly so that it will give you years of reliable service.
Check out the next section to get tips on how to do that...
How to Care for your Sashimi and Sushi Knife
You paid good money for your sushi knife so you should take good care of it.
Here's a few things you need to do each time after you use it.
- Wash your sushi knife with soapy water, rinse and dry it WELL by running the sushi knife through a dry towel. This is especially true for carbon steel knives as they will rust and pit if left wet.
- Never put your sushi knife in a dishwasher.
- Store your sushi knife in a case, wrapped and in a separate space in a drawer or on a rack.
A couple more things to mention:
- Do not use a sharpening steel to sharpen your Japanese sushi knife; only use a water stone or whet stone. Follow your knife manufacturers directions for using a whetstone.
- When cutting acid sources like lemon, apples or sushi, try to wipe or wash the knife frequently
- Do not cut frozen food with your sushi knife. Doing so may chip it.
At some point your brand new sushi knife is going to need to be sharpened. Especially if you didn't do it when you first got it home after buying it.
Its not as frightening as it might sound though. Just follow the instructions that follow and you'll be a pro in no time!
How to Sharpen your Japanese Sushi Knife
Keeping a Japanese sushi knife or sashimi knife continuously sharp is almost like a religious ritual to most sushi chefs. After all, it is their livelihood. And most chefs will sharpen all of their knives at the end of the work day so that they will be fresh, sharp and rested overnight so they will be ready for use the next day.
Some say that it is necessary to let the sushi knife rest overnight after sharpening or it will affect the taste of the food. The jury is till out on that one for me...but I'll tell ya, a lot of times there's truth in those weird sounding habits and traditions...
Now, even for the home sushi chef it is still just as important to keep your knives diligently sharp. And in actuality, the sharper a sushi knife is, the safer it is to use. Sounds counter intuitive, but its supposedly true.
Taking the time to touch up the edge of your sushi knife often, even while it is still fairly sharp, is an easier way to keep an edge pristine than letting the blade get dull before doing it. The difference can even mean spending a matter of minutes on it as opposed to an hour or more.
Before we get into the nuts and bolts of sharpening your sushi knife though, let's first talk about the design of the sushi knife and its edge so you actually have some understanding of what it is you are trying to do. And then we will cover a few more important points before getting into basic knife sharpening.
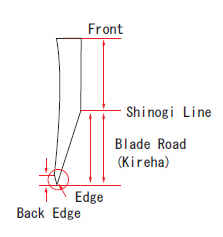
Design of a Traditional Japanese Sushi Knife Blade
In the diagram above, this is the view you would see from the back of the sushi knife if you were holding it in your right hand and extended it out.
The right handed sushi knife is the most common, and the main edge is also on the right side.
Traditional Japanese knives are known for their precision and ability to be honed to an extremely sharp edge because of a unique single-edged design.
There are also western-style Japanese knives that have a double-edged design called "Ryoba", but we'll talk about that later.
Follow along with me by looking at the image above as we describe this single-edged design.
Starting at the top front face of the blade, the right side of the blade travels down until it is broken by the Shinogi line. This line is where the cutting area starts to taper down to the bottom edge. This tapered edge is called the "Kireha" or "Blade Road" and is very important in affecting the way the blade moves through food.
Important Point: Remember to never change, alter, or erase the Shinogi line when sharpening your knife.
If you will notice, on the back of the blade there is a slight curve. Looks kind of like it bows in. This curve is called the Urasuki and is present on the back of Yanagi, Deba and Usuba knives. This design allows food to separate cleanly after it is cut and also acts as a cushion for the knife, absorbing weight and pressure.
On Sharpening a Traditional Japanese Knife Blade
When you are sharpening a traditional Japanese Knife, it is necessary to use the shinogi line as a guide but know that you are only sharpening the very edge not the entire blade road.
Very Important Point: Remember to use the Shinogi line as a guide, but sharpen the very edge, not the entire blade road.
So let's think about this a little bit. If you lay the knife down too far when sharpening, you risk getting into the blade road and Shinogi line. While you also don't want to have your knife up too far either or you will change the angle of the original edge.
At this point, just look at the picture above and be aware of why you have to try to be in that happy medium; where the spine of your knife is not too far up from the stone...or too far down either.
Edge Sharpening Technique
When you are actually sharpening a knife, place your fingers very close to the blade edge and use firm pressure to insure even contact with the stone.
Normally, a traditional Japanese knife should be sharpened one or two strokes in one section and then move your fingers on to the next section for one or two strokes. Do this and move continually down the full edge of the blade. This is especially important for the Yanagi (sashimi knife). The Yanagi has a thin and delicate blade that will become weak if you do too many strokes in one place.
Important Point: Place your fingers very close to the blade edge using firm pressure to insure even contact with the stone and only for 1 or 2 strokes. Then move your fingers to the next section down the knife, repeating until the whole length of the blade has been covered.
Follow these techniques when sharpening until you feel a slight burr on the back edge of the knife.
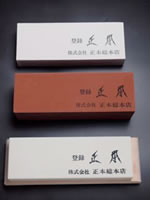
Which Whetstones or Water stones do you need?
Ideally, there are 3 that you would need:
- Arato - This is a coarse grit stone used mainly to fix damaged edges and to create new edges. The average grit for Arato is around 400 or 600 but can vary higher and lower than this.
- Nakato - This is a medium grit that is mainly used for minor repairs and creating sharp edges. The average grit here is 1000 to 1200 but again this varies higher and lower than this.
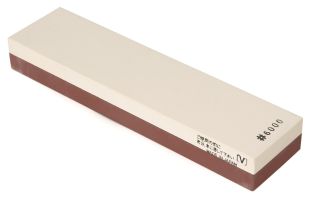
- Shiage - Is a fine grit finishing stone. Here the average is 6000 to 8000 but varies also.
For at home use you could get by well with a combination stone that has Nakato on one side and Shiage on the other.
*One thing to note. When you are sharpening with a medium grade grit (Nakato), you are making small scratches on the surface of the metal. When you move to the finer grit (Shiage), you are polishing out those scratches to create a polished, sharp edge.
That's why it is important to keep a consistent angle of knife to stone the whole time you are sharpening so that you will be polishing along the same lines and in the same direction as you did when you created them with the more abrasive stone in the previous stage.
Time to get into sharpening your knife.
Knife Sharpening Basics
Preparing the Sharpening Stones
A level stone surface is necessary to sharpen your blade properly and to avoid damaging it. Water stones or whet stones and stone fixers should be soaked in water for 10 minutes before sharpening or until there are no more bubbles.
Take the edges down on the sides with the stone fixer first to bevel them and then "sand" the top of the stone until it is flat.
When you are done with that, place the stone (with the narrow end pointing away from you) on a damp towel to keep it from sliding during sharpening.
How to hold your knife during Sharpening
Hold the knife in your right hand with your thumb on the flat part of the blade, your index finger on the spine and your remaining 3 fingers wrapped around the blade.
Hold it comfortably, but not in a manner similar to using it for cutting. The angle of the knife to the stone should be around 60 to 70 degrees but it can vary to between 45 to 80 degrees. The most important thing is keeping the angle consistent for best results when sharpening.
Sharpening your Traditional Japanese Knife
I bet you were starting to wonder whether or not we were ever actually going to do this! :-)
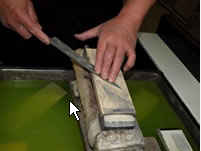
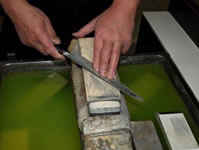
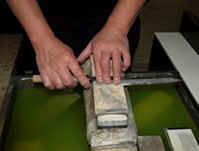
- With your knife on the front of the stone nearest your body, place 2 or 3 fingers on your left hand near the edge of the blade, starting with the tip.
- Exert even pressure down on the blade edge where your fingers are when you push the knife down the stone because this is where you are focusing the sharpening.
- Now, push the knife down the length of the stone. Release the pressure from your fingers when you bring the knife forward and back to the starting position again. Do this one more time before moving to the next section down the blade. This is especially true for the Yanagiba because of its thin and more delicate blade. Either way, do no more than 5 or 6 strokes before moving to the next section.
- Remember to keep the same angle on the blade edge to the stone (normally this would be about the space of a business card between the spine and the stone) as well as the same angle of knife to stone as you move down the blade.
- As you sharpen, you will start to feel a slight burr form along the edge.
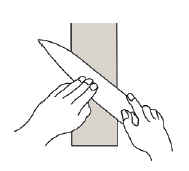
- When you have a burr along the whole edge of the blade, reverse the blade placing it perpendicular to and flat against the stone (see the image below) at the far end.
- Place the middle and index finger of your left hand gently against the blade edge and your thumb gently pressing against the spine.
- Exert gentle pressure on your fingers and pull the knife toward you.
- Think of this motion as trying to "scrape" water off the stone. And remember that you are not sharpening here, but only removing the burr.
- Move to the next section as necessary to remove entire burr. When the burr has been removed from the whole length of the blade the sharpening is complete.
Note*** Add sprinkles of water to the stone as needed for lubrication and don't remove the sludge that forms because it actually aids in the sharpening process.
Sharpening your Western-style Japanese Knife
If you happened to get a western-style Japanese knife like a Gyuto or Nakiri, you will have to sharpen it differently than your traditional knife.
First, you will have to determine the angles of your front and back edges. You can get it from your manufacturers information that came with your knife but here's another way.
Determining the angles of your blade:
Place the face of the blade flat against the stone. Now lay your fingers half on the stone and half on the blades edge. Raise the spine of the knife slowly until you can feel the bevel make flat contact with the stone. This is the angle you want to sharpen this side at.
Do the same thing for the other side.
In general, a 70:30 knife will have an angle on the front side that will be equal to 2 pennies stacked under the spine and on the back side equal to 3 pennies stacked under the spine.You could use that as a general guide.
Besides the angle, sharpen your western style knife using the same technique described for the traditional style knife explained previously.
For more information on general knife sharpening techniques, visit this page http://www.knifeplanet.net/55-experts-share-knife-sharpening-tips/.
Write a Review about YOUR Sushi Knife.
If you have a Sushi Knife why don't you write a review and tell us about its strong points and weak points. What do you love about it? And what do you wish was different?
What Other Visitors Have Said
Click below to see contributions from other visitors to this page...
I.O. Shen 


I have used many fine Japanese Yanagiba and have my favorites. I recently bought a rather inexpensive I.O. Shen, a Taiwanese blade, Rockwell 62 sandwiched …
Like this Page?
|
|
Follow me on Pinterest





New! Comments
Have your say about what you just read! Leave me a comment in the box below.