Futomaki
Thick rolls with Rice on the Inside and Nori on the Outside

Futomaki is the "fat boy" of the maki roll lineup coming in at 2 to 2 1/2 inches in diameter and containing 4 or more ingredients.
Because this roll is so large, some find it harder to roll than a chumaki roll.
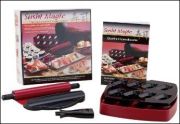
If you are or think that you might be traditional "sushi mat handicapped", you should check out the sushi magic sushi making kit here on amazon. I think that it actually does make the sushi rolling process easier for most people. If you want to see my review of it, pictures and all, go here. It it is the only non-traditional sushi rolling device that I recommend.
Not only is this fat guy challenging to roll for some people, it can also be quite a mouthful and usually take 2 or 3 bites to eat.
If you want to get technical and you know something about sushi etiquette, this makes it very hard to stick with the "eat in 1 bite without setting it back down" sushi etiquette rule when eating at a sushi bar. These things can be that darn large.
I think in this case however, they should be willing to turn a blind eye.
If you want to try to follow the rule without choking to death in the process, then continue to hold it in your hand after each bite until you are done with it and you will be fine.
My Mother's Futomaki
When I was growing up, my mother's futomaki was a treat. Normally we would have tea with it, and there would be no other sushi to be eaten with it. Why bother? Futomaki is a meal in itself.
It was also like a vegetarian break from all of the sashimi and other meat based sushi that we would have, because my mother's futomaki never had any meat in it. Ever.
Now, I know that you can put meat in futomaki and there is nothing at all wrong with that. After all, you can make it with whatever you want.
But truth be told, it was a welcomed change and very delicious change of pace. The egg, vegetables and seasoned ingredients were very light and refreshing. I can't think of making it any other way.
And I'm sure if you follow this recipe, you will feel the same way and will start looking forward to it just like I did when I was growing up.
Some of the ingredients that I really liked in my mother's futomaki were japanese omelette (Tamago), seasoned shitake mushrooms, spinach, seasoned kampyo (gourd strips), sakura denbu (seasoned ground codfish) and strips of seasoned fried bean curd (or abura age - which is also used to make Inarizushi).
Other common ingredients can include japanese or hothouse cucumbers, avocado (more in the U.S.), and carrots. But you can make it with anything that you really like.
We will be learning how to make the futomaki that my now 80 year old Japanese mother use to make for me when I was growing up.
And believe it or not, when I was talking to her about this, she said that a lot of what she was telling me she had learned from her mother. Folks, we are going back to how my mother was taught to make futomaki by her mother back in 1930's and 40's Japan.
I never knew that when she made it for me as a kid. It makes me appreciate it even more now.
Why I use Sakura Denbu

One thing that I didn't know before was why my mother always used sakura denbu. This is the normally pink, seasoned ground codfish I mention below. When I asked her about it, she said that her mother always put it in her futomaki, so that's why she uses it.
Wow. So in the 1930's and 40's my grandmother taught my mother to always use Sakura Denbu. Well that's a good enough reason for me.
And honestly, most of the other recipe's that I have ever seen rarely mention using this ingredient.
And
that is so sad. Because it really does make for the best futomaki. See
the picture above? Notice the pink tint in it? That is sakura denbu. It
tastes...hmmm...slightly fishy and sweet. It is distinct and wonderful.
Make sure to get some of it for your futomaki (amazon has it).
So ok. Let's get started.
Ingredients to prepare for Futomaki
We will begin by preparing each of the ingredients before we assemble them in our futomaki. The ingredients that we will be preparing will be:
1. Seasoned Shitake mushrooms
2. Seasoned kampyo (gourd strips)
3. Seasoned fried bean curd (or cucumber if you want)
4. Spinach
5. Tamago (Japanese omelette)
6. Sakura Denbu (no preparation needed as it is seasoned ground codfish but is critical part of the unique flavor for duplicating my mother's futomaki)
Supplies
Now, you don't have to prepare every single one of the above ingredients. You could choose to make either (2) or (3) above and replace one with cucumber if you 'd like.
The reason I say this is that 1, 2, and 3 above are prepared in a juice base that is very similar and if you want to try to balance it out a bit with a more non-marinated vegetable (like the spinach) you could replace one of those with a cucumber or carrot or whatever you might like.
It's up to you. Try it with all of the above the first time and then swap one out the next time. Then see which you like better.
How to make Seasoned Shitake Mushrooms for Futomaki
Ingredients
6 dried shitake mushrooms
1/4 cup shitake water (from soaking your dried shitake)
1/4 cup of traditional homemade dashi (or make 1 cup of instant dashi by combining 1 cup boiling water + 1/2 tsp instant dashi powder and use 1/4 cup of this)
2 Tbs Mirin (or Sake if you have no mirin)
1 1/2 Tbs Sugar
1 1/2 Tbs Soy Sauce
Preparation

1. Soak dried Shitake mushrooms in 1 cup of water overnight. Place something on top of the shitake to keep them under water while they soak like a small plate. Otherwise they will float. Soaking overnight is not absolutely necessary, but my mother says that the shitake water flavor is better the longer the shitake soaks. If not overnight, soak until the shitake is soft (3 hours minimum).
You can also soak the kampyo (see next recipe below) overnight in its own bowl when preparing the shitake for overnight soaking.

2. Squeeze the soaked shitake mushrooms over the soaking dish to reserve as much shitake juice as possible.


3. Remove the stems and slice shitake thinly and place in a pot.


4. Add shitake juice, dashi, sugar, and mirin (or sake).


5. Bring mixture to boil, then immediately reduce heat to low to simmer. Cook for approximately 10 minutes.
6. When shitake is close to being done (softened and still slightly firm; not limp-about 7-8 minutes) add the soy sauce and cook 2 - 3 more minutes.
7. Don't overcook the shitake. You want it to still be slightly firm; similar to al dente pasta.
8. Remove the shitake from the pot with a slotted spoon and set aside for later.
You can reserve the liquid in the pot to use for the Kampyo if you'd like. My mother does this.
And quite honestly, I wasn't sure if it was better to do this, or make a new batch for each ingredient as we went forward. So I tested it.
I did both. And in the end, the ingredients were all better when the juice was passed forward and added to for each ingredient.
All the way down to the abura age and I think I have a theory on that. I think the cooked shitake sauce from this recipe adds to the flavor all the way down to the abura age and I think it tastes better than making fresh sauce just for the abura age.
So if you are making this recipe as stated, try to pass the sauce forward and add to it.
But if you'd rather not and just make it "fresh" for each recipe, that is fine too.
How to make Seasoned Kampyo for Futomaki

If you are tempted to skip this ingredient because you don't know what it is, or it sounds just too weird for your tastes, I strongly encourage you not to. You WILL love it. You should be able to find it in any Japanese grocery store, or you can get it online from here.
If you buy the variation in the can which is already prepared, still make the cooking marinade below but cook it for only a few minutes so it won't get mushy but will still absorb some of the fresh flavor of your homemade marinade.
Ingredients


48 to 72 inches Dried Kampyo Gourd Strips or gourd strips in a can (16-24 inches per roll)
1/2 cup shitake water (from soaking your dried shitake). If you don't have shitake water, then use 1 cup dashi (below)
1/2 cup of traditional homemade dashi (or make 1 cup of instant dashi by combining 1 cup boiling water + 1/2 tsp instant dashi powder and use 1/2 cup of this)
1 Tbs Sake (or Mirin if you have no Sake)
2 Tbs Sugar
2 Tbs Soy Sauce
Preparation

1. Rinse Kampyo in water and put them in a bowl.

2. Knead the kampyo with salt until soft to break the fiber. Taking both hands and rubbing the kampyo vigorously with the salt works well.
3. Rinse off the salt and then soak it in water for 2 hours. A lot of times, I will soak the kampyo overnight in a separate bowl at the same time that I am preparing the shitake to soak.

4. Place Kampyo and water in pot and boil gently until softened, about 10 minutes. Drain well.

5. In the same saucepan with the reserved liquid that you cooked the shitake in (only if you want to use it as a base and add to it which I do think tastes better), add the kampyo, dashi, sugar, sake and soy sauce and bring to boil.
If you did not cook shitake or don't want to use the reserved liquid, then just add the above ingredients and bring to boil.
6.
Reduce heat to low and simmer for 15 minutes or until kampyo is
crunchy/crispy tender. You should be able to easily bite off a piece
with it still being firm (NOT mushy).


7. You can also test for doneness by taking a piece of kampyo and trying to press your fingernail into it. You should be able to cut it with your fingernail.
8. Remove with slotted spoon and reserve liquid for abura age (if desired and you are cooking that next).
How to make Seasoned Fried Bean Curd for Futomaki

Ingredients
 and inarizushi-no-moto in a can (seasoned)")
1 can Inarizushi-no-moto (seasoned-contains 16 bags) or 1 package abura age (unseasoned-when split will be 4 larger bags)
1 cup traditional homemade dashi (or make 1 cup of instant dashi by combining 1 cup boiling water + 1/2 tsp instant dashi powder)
3 Tbsp sugar (Add or reduce sugar to your liking next time)
1 1/2 Tbsp Sake (or 3 Tbsp Sake if you have no Mirin)
1 1/2 Tbsp Mirin (or 3 Tbsp Mirin if you have no Sake)
3 Tbsp soy sauce
Preparation
 and inarizushi-no-moto (seasoned-on top)")
You can buy Inarizushi-no-moto (fried bean curd) bags already seasoned (smaller, darker bags in picture above) or if you buy abura age unseasoned (lighter, larger bags on the bottom) , then you will have to prepare it properly first before using it.
Either way, my mother always cooked the already prepared fried bean curd bags (that usually come in a can) so if you follow this recipe, you'll be cooking the abura age no matter which version you buy.
And although you can eat the prepared bags right out of the can and they do taste fine, they don't taste as good as if they are "recooked" in your own sauce base. To me, they taste like they have a chemical or a can taste so I always recook them.
And buying them in a can is cheaper as you can get around 16 bags (although smaller) instead of the 4 you get when you buy the unprepared abura age for almost the same price.
You can pick up abura age (unseasoned) in the refrigerated section of any Japanese or some oriental grocery stores. You can also find them online too.
Preparing unseasoned Abura Age for cooking

1. First, lay the Abura age (unseasoned only) on the counter or cutting board and cover it with plastic wrap or put it in a plastic bag (like in the picture above).
2. Take a rolling pin or use a can and roll over the Aburage a few times. This will make it easier to open the pocket later. Remove the saran wrap or remove from plastic bag.


3. Boil the pouches in water for about 2 minutes to remove excess oil. Remove the pouches from the water and drain the water from the pot.
Cooking the Abura age or already prepared Inarizushi-no-moto

4. In the same pot and the same sauce that you cooked the shitake and kampyo in, combine the dashi, sugar, sake, mirin and soy sauce for this recipe. If you'd rather not use the previously used sauce, then just combine the ingredients for this recipe.
5. If you are cooking unseasoned abura age then simmer them for 12-15 minutes. If you are recooking the seasoned bags from a can then cook them for 7 to 8 minutes.
Put a small sheet of aluminum foil (with a few holes poked in it) shaped to fit inside the pot so that it rests on the liquid to keep pouches submerged while cooking.
Keep flipping them over and pushing them down if not using the foil suggestion to keep them down.
8. Remove the pouches from the pot and allow to cool before slicing.

9. Slice pouches about 1/3 to 3/8 inch wide. Set aside.
How to make Spinach for Futomaki
Ingredients
3 cups of water
1/2 tsp salt
3 cups spinach
Preparation
1. Bring 3 cups of water and 1/2 tsp salt to low boil.

2. Add spinach and cook for 1 to 2 minutes at most. You basically want the spinach to wilt but still be slightly firm and not mushy.

3. Drain in colander and rinse with cool water to stop the cooking process and to keep the spinach from getting limp.

4. Drain again and squeeze out excess water from spinach and set aside.
How to make Tamago for Futomaki
Ingredients
5 eggs
1 finely minced green onion
1/4 cup dashi
1 Tbsp. Mirin (or Sake)
1 Tbsp. sugar
Pinch of salt
Preparation

1. Put the eggs in a container (like the measuring cup above) and beat.


2. Add all of the above ingredients and mix until sugar has dissolved.
3. Oil a rectangular tamago pan if you have one, if not a regular pan will do.
4. Heat pan on a low setting so egg will not burn.

5. Pour a thin layer of egg into the pan, covering the entire surface.

5. In 2 - 3 minutes when the egg is almost set, fold the nearest 1/3 edge over and away from you.

6. Fold another 1/3 away from you leaving the remaining 1/3.

7. Pour another thin layer of egg mixture to cover the 2/3 of the pan that no longer has egg on it.


8. When this egg is almost set, then fold the thicker omelette stack (that is farthest away from you) toward you in 1/3 increments finally giving you the 1/3 omlette stack closest to you.
9. Repeat this process until you are out of egg mixture.


10. For Futomaki, you can slice this omelette stack across the width about 1/3 to 1/2 inch wide depending on what you like.
11. You can also slice this for use on Nigiri sushi if you want to also.
How to make my Mother's Futomaki Roll

Ingredients
Sushi Rice (this will yield 4 cups of rice and this recipe 2-3 rolls. 2 rolls will use 1 and 1/2 cups, while the last roll may be left with about 1 cup)
Sakura Denbu (seasoned ground codfish)
If you followed the previous recipes to prepare everything to fill this futomaki roll, you should have something similar to the picture below.

What we have starting with the spinach and going around to the right are:
1. Spinach
2. Seasoned Shitake Mushrooms
3. Seasoned Kampyo gourd strips
4. Seasoned abura age (or inari sushi bags)
5. Tamago (egg omelette)
Preparation
")
1. Futomaki is made by laying a full 8 x 7 inch sheet on a bamboo sushi mat with the 8 inch side closest to you.


2. One of the best ways that I have found
to make your futomaki rolls a consistent size is by measuring your rice
each time. This roll uses 1 and 1/2 cups of rice. Take your 1 cup measure and moisten the inside with vinegared
water so that the rice will not stick. Shake out any excess. Then
measure out 1 cup of rice and put it on your nori sheet.
Then take your 1/2 cup measure and do the same thing again.
Refer to the
pictures above.


3. Dip your hands in vinegared water (1/4 cup rice vinegar + 1 cup water) and tap your fingers on a folded damp rung-out towel to remove any excess water.


4. Spread the 1 and 1/2 cups of rice over the entire sheet coming to the edges on the right, left and closest to you but leaving about a 1" strip along the 8 inch side farthest away from you.
5. If using wasabi or a condiment of some sort, spread it across the center of the rice. I am not using any for this roll.
6. Spread the kampyo across the center of the rice. Lay 2 or 3 full strips all the way across.

7. Spread about 2 rows of the inari sushi (seasoned abura age) across the center of the rice on the side closer to you, right next to the kampyo.

8. Add about 2 rows of the shitake mushrooms across the center of the rice on the side farther from you, right next to the kampyo.

9. Spread about a 3/8 inch row of spinach on the side farther from you, right next to the shitake.

10. Add a row of tamago on the side closest to you, right next to the inari strips.

11. Next to the spinach spread a pretty generous row of sakura denbu. Use at least twice as much as I have in the picture above. There are so many ingredients in this roll that you can't taste the denbu unless you put a lot more than you think you need.
You could spread some denbu in between some of the other ingredients also to intensify the flavor.

12. Lift the edge of the mat closest to you with both hands by putting your thumbs under the mat and while lifting up, use your fingers to hold the fillings in place.

13. Keep rolling, while pressing the fillings into the rice and stop when the mat touches straight down on the far edge of the rice. Make sure the exposed nori is still visible.


14. Tighten up this part of the roll by pulling the mat covered part of the roll with your left hand while also tugging 3 times on the free edge of the mat with your right hand; once in the center, once on the left and once on the right.

15. Now, continue to roll until the
exposed part of the nori has been rolled under. Hold it still for a
little bit to allow the roll to seal.


16. Wipe your sashimi knife on your damp vinegared towel so that it won't stick, and slice the roll exactly in the middle (left picture). Take the 2 pieces and lay them side by side and slice in the center again (middle picture). Finally, slice each remaining piece in the middle one more time (rightmost picture) making 8 total pieces.

Enjoy!
Like this Page?
|
|
Looking for Something in Particular? Search this Site using Google Below!
Like this Site?
Like this Site?


Visit AllAboutSushiGuide's profile on Pinterest.

%20and%20inarizushi-no-moto%20in%20a%20can%20(seasoned))
%20and%20inarizushi-no-moto%20(seasoned-on%20top))
)
Follow me on Pinterest

New! Comments
Have your say about what you just read! Leave me a comment in the box below.